Saturday, July 1, 2017

Force Z Sallies Forth

Early December, 1941, somewhere near Singapore.

After the strikes on Pearl Harbour, the Japanese have launched a lightning offensive against Britain's colonial holdings in southeast asia.
Now, a Japanese invasion force has been spotted approaching Singapore.

The choice is made to attempt interception.
After a number of furious arguments, it is decided that all available air assets will be used to protect Force Z from air attack on the way in.

The plan seems to be working, at a heavy price to ABDA airpower, until large enemy vessels are detected between Force Z and the projected location of the landing force.
The Imperial Japanese Navy's escort force has intercepted the British.


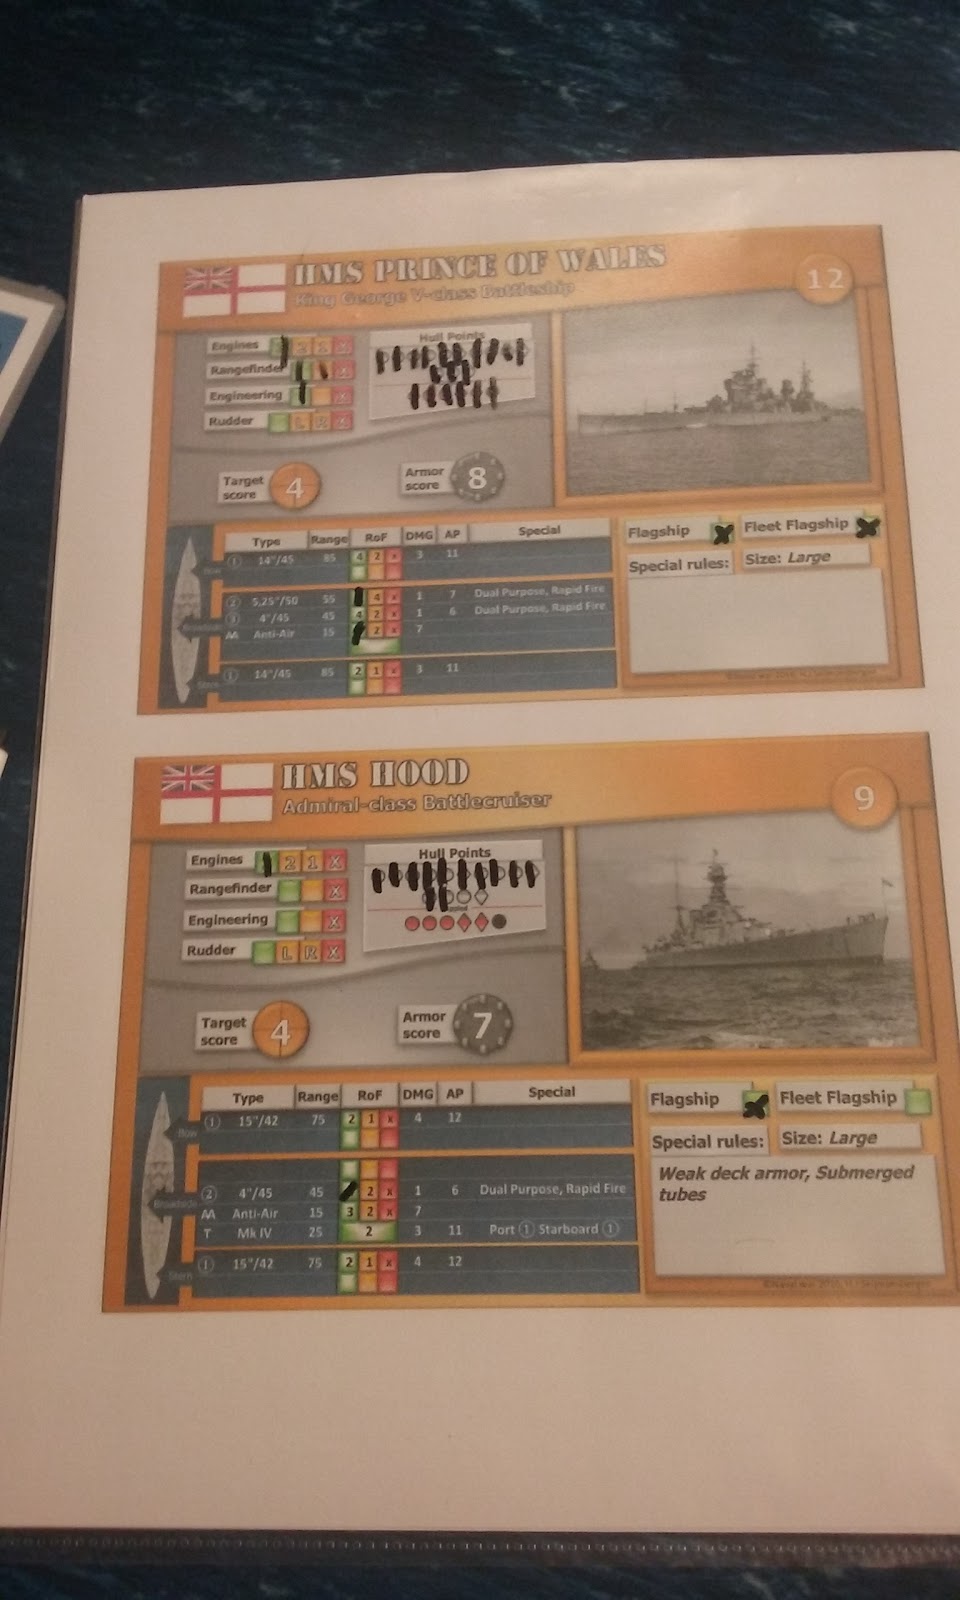
Force Z is led by the brand-new battleship Prince of Wales.
With her teething problems fixed since her fight against Bismarck, she is among the most effective battleships in the world at this time.

Supporting her is the battlecruiser HMS Repulse, adding a considerable amount of 15-inch firepower.

As a screening force, the destroyers HMS Express, HMS Electra and HMAS Vampire are joining the capital ships.

A significant force.
But will it be enough? The fate of Singapore hangs in the balance.


Opposing them is part of the IJN cover force.

Fast battleships Kirishima and Hiei were in position to respond.
Though neither is a match for a battleship like PoW solo, they do posess significant firepower.

Kagerou-class destroyers Amatsukaze and Yukikaze have also rushed in, ready to support the grand old ladies of the IJN and hopefully introduce some capital ships to the merits of the Long Lance torpedo.


Turn 1 initiative goes to the Royal Navy, who decide that the IJN will have to move first.

The Japanese vessels charge forward, with the destroyer screen turning straight towards the Brits and going to flank speed.

The British force also goes to flank speed and turns hard to port, hoping to cross the T of the Japanese force.
This also means their destroyers are now essentially leading the capital ships in a column.

All ships are still outside effective range, though that should change any minute now.


In turn 2, the IJN win initiative and decide to go first.

Both destroyer screen attempt to rush forward at flank speed, but in both cases things go wrong.
Amatsukaze and HMAS Vampire both strain their propulsion too much, damaging it and forcing their squadronmates to slow down so they can stay together.

The IJN battlecruisers also move forward, into firing range of HMS Prince of Wales.

The British destroyers open fire at Yukikaze, dealing minor damage but causing casualties and chaos among the engineering sections. However, their attempts at a higher rate of fire disregarding safety procedures results in some guns on Express and Encounter out of action.
Return fire from the front guns on the IJN destroyers scores some hits, but to no effect.

Prince of Wales turns further to port, preparing to face the IJN battlecruisers broadside on.
Repulse can't complete the turn in time and remains out of range.

Then, Hiei's foreward guns open fire at Prince of Wales and find their range almost instantly.
Minor damage is dealt and a fire is started.
Kirishima follows up with a full broadside, also finding the range thanks to a stroke of luck. All her fire bounces off PoW's thick armour, though.
Her secondary weapons also range in on HMS Express, though they deal no damage.

Prince of Wales returns fire, also ranging in and damaging Kirishima's A turret.
Effective damage control manages to keep the turret in action, though.
Similarly, Amatsukaze's engines are restored to full functionality.

On the other end, damage control crews on PoW also manage to put out the fire.

Problems on Yukikaze's engineering and Vampire's priopulsion are not so easily fixed, though.


Turn 3.
Royal Navy win the initiative and elect to go first.

Both capital ship squadrons turn to almost-parallel course, allowing them to engage broadside on.

Then the Brits open up, disregarding safety for fire rate.
Unfortunately for the Brits, the broadside mostly misses, with the sole hit actually deflected by Kirishima's armour.
Repulse is much more fortunate. Her ranging volleys are almost immediately on target and score multiple hits focused around Kirishima's secondary armaments, which are knocked out. Fires also start raging around them.

Kirishima's return fire is rather limited, scoring some hits but very little damage, only disabling some secondary guns.
Hiei's fire, on the other hand, is devastating. She manages to score plunging hits down into PoW's engineering spaces, dealing heavy damage, starting fires and reducing her effective speed. Her captain decides to keep her in the fight, though.
Hiei's tertiary guns also deal light damage to Express, setting her aflame.

The British destroyers charge towards the IJN battlecruisers, determined to deliver their torpedoes or sink trying.
Instead of trying to stop the Brits, the IJN destroyers speed past them, one launching a spread at the destroyers, the other at HMS Repulse...

The destroyers exchange fire, with only Yukikaze dealing some damage to HMS Express.

Damage control is mostly effective on both sides, with Prince of Wales extinguishing almost all her fires and restoring normal propulsion.
However, fire continues to rage on HMS Express, so her captain decides to vacate the battlefield.

Then, the torpedoes start hitting...


The already-battered Kirishima takes 4 more hits, leaving her barely afloat, crippled and breaking off from the battle.
Hiei also takes several hits.
Although they are mostly deflected by her armour, some fires and heavy flooding are caused.

Vampire's torpedoes were launched too eagerly and ended up out of range.
Amatsukaze's volley was dodged by the British destroyers.

However, three of Yukikaze's torpedoes manage to hit HMS Repulse.
These deal heavy damage, though Repulse's flooding-prevention efforts prove quite effective.

Our next turn will probably be the last.


The IJN win initiative on turn 4 and elect to move first.

Their first move is to send their destroyers into torpedo range for the British battlewagons.

The Brits respond by opening up against Hiei with maximum rate of fire.
However, some things go awry.
Prince of Wales's main battery turned out to be not quite fixed enough for this fire rate, leaving her quad 'A' turret non-functional and causing her other fire to miss in the confusion.
Her secondaries do manage to deal minor damage to Yukikaze, but not enought to stop a torpedo launch.

Repulse is much more effective, scoing multiple hits on Hiei's X and Y turrets, knocking them both out of action.

Yukikaze and Amatsukaze launch their remaining torpedoes, causing PoW and Repulse to turn into them to reduce their odds of being struck.

Hiei's A and B turrets continue pounding Prince of Wales, finding more gaps in her deck armour and doing enough damage that her captain decides he must break off to preserve the ship.
Her secondary armament also manages to finish off HMS Express.

Further firing between the destroyers forces Yukikaze to break off and causes slight damage to HMS Electra.

Repulse and Prince of Wales mostly succeed at their damage control, but PoW fails to rally and continues fleeing the battlefield.

Hiei has less luck with her damage control and gets crippled by the flooding damage.
Her captain refuses to break off, however.

Repulse and goes evasive as the torpedoes come speeding in.
Still, one hits home, dealing serious damage and causing some flooding, but nothing critical.

PoW gets lucky and avoids all four torpedoes heading her way.

With that, both sides have at least half of their force´s fighting strength broken off or destroyed, so both disengage to lick their wounds.


So, how must we judge the results of this battle?

The IJN have had two of their old fast battleships heavily damaged, to the point where they will need major repair.
Fortunately, aerial dominance in the region means that they should be able to return the vessels to a friendly port slowly but safely.
This might not work for Kirishima, though, if damage control had taken too long shoring up the flooding she had when fleeing the battlefield.
One of their two destroyers had also taken some damage, but Yukikaze should be fit for duty again relatively soon.

Having both Prince of Wales and Repulse heavily damaged is rather bad, but there is also the question of these nigh-crippled vessels would be able to make it back to a friendly port safely considering the amount of Japanese airpower around.
Losing a perfectly good destroyer is another loss, though at least Electra and Vampire should be fine.

While this might have been a draw (or slight British win) in a tactical sense, the strategic picture is a lot more dire for the Allies.

With the amount of damage sustained, a strike against IJN invasion forces is no longer possible, probably dooming Singapore.
While the temporary loss of a pair of fast battleships would be impractical for the IJN, fuel constraints mean this is less of an issue than one would think.

Overall, I'd say this result is better for the British than the historical one, though the historical outcome was pretty close to worst-case.


About Naval War:

Naval War is a free living ruleset (which means it gets regularly updated to correct errors and clarify issues) that can be found at https://www.naval-war.com/.

If this seems interesting, do head over there, grab the rules and get some ships (or even just printed tokens to represent them) and head into the fight.
We in the community also really enjoy reading about your experiences with the game, no matter how glorious or horrendous they may be.

Sunday, January 22, 2017

Fleet review - January 2017

After a fair bunch of work, this weekend I managed to get all of the warship models I reasonably plan on using painted.

Therefore, I decided that it was time to place all of these minis together and see how they looked.
I do own a handful of random additional Axis & Allies sculpts and a couple of spare Asashio-class destroyers, but I'm not really counting those.

What am I counting then, you ask?
Well, pretty much this:


Let's take a bit of a closer look at those things.

Kriegsmarine:

Only two vessels for my small German force: Bismarck and Prinz Eugen, both from matt_atknsn on Shapeways.
Some of the most recently painted and only fielded once so far. And that was against me.

Royal Netherlands Navy:

Another rather small force, but that's historically correct for my home country.
The Dutch navy was in a rather bad state in WW2, as can be seen with this pair of subpar light cruisers which met their ends in the Java Sea.

From left to right, we have light cruisers Java and De Ruyter and a pair of Admiralen-class destroyers.

The Java model is another Shapeways purchase, the other three are Axis & Allies minis.

US Navy:

A bit more of a force available here, though it's still rather small considering the large role the US Navy played in WW2. This US force is the most likely candidate for major expansion.

Going from left to right the top row contains fleet carrier USS Wasp, heavy cruiser USS Houston, a pair of Cleveland-class light cruisers and a Brooklyn-class light cruiser, USS Phoenix. Closing out the row is the landing ship dock USS Gunston Hall.
On the bottom row, we have the old submarine S-37 with its submerged marker, a trio of Fletcher-class destroyers (including the least fortunate vessel in the US Navy) and a quartet of Clemson-class destroyers.


In terms of sculpts, we have another mix of Axis&Allies and Shapeways sculpts here, with many of the A&A ones being kind of poor.
And yes, I know USS Houston historically never had this colour scheme. I decided to accept some historical inaccuracy for the sake of looks.

Royal Navy:

We increase the scale a bit further as we reach the Royal Navy, including other Commonwealth vessels.
My second-biggest force and a classic one with the King George V battleship and the pair of battlecruisers.

From left to right on the top row we have the battleship Prince of Wales, the battlecruisers Hood and Repulse, the heavy cruiser Exeter and the light cruisers Achilles and Perth.
On the bottom row we have three E-class, two J-class, one Tribal-class, one S-class and one V-class destroyer. Closing things out we have a cute little Flower-class corvette.


We have another mix of Shapeways and A&A stuff here, with HMS Exeter actually being a converted York model since I was having trouble getting my hands on a purpose-sculpted Exeter one.


I decided to stick to a handful of colour schemes which work decently well together, even if that means that some ships aren't entirely historically correct when put next to each other.
I mostly stuck to the simple gray North Atlantic colours and the dark and light gray used at various points in the Pacific.

Imperial Japanese Navy

Finally, we reach by far the biggest force in my collection.
Most of this one is Shapeways stuff, but with some exceptions.


We start with the big ships: aircraft carrier Shoukaku, followed by the battleship Nagato and her sister ship Mutsu. Finally, we have the Kongou-class "fast battleship" Kirishima.
All of these models are from Shapeways, except for the turrets on Mutsu.


Next we have the cruisers, starting with the Myoko-class heavy cruisers Haguro and Nachi.
They're followed by the light cruisers Agano, Ooi (she with 20 torpedoes per side) and Sendai's sisters Naka and Jintsu.
The last two are Shapeways here, the others A&A.


Subs. I-19 and I-25, with another submerged marker for the latter. Both are A&A, from the second starter set like both Myokos.


Destroyers. Not even all of them since they won't fit properly into a single picture.
We start with three Fubukis and six Shiratsuyus, recognizable by their fairly bright lifeboat covers.


In the second half, we get a trio of Kagerous, a pair of Asashios, a pair of A&A Akizukis, another Shiratsuyu (this one, Shigure, an A&A sculpt), an A&A Matsu and finally an A&A T1 landing ship.


Quite a few minis that I've collected over the last year or 2. Not the greatest quality level of painting, but I feel it's decent enough to put on the table.
I might still go back and touch up a bunch of these, though. That would probably be quick and worthwhile.

Now to decide what I'll allow myself to grab next.
One important consideration in that is that the local store might be able to get 1/3000 scale stuff in stock. That might cause me to shift some of my focus to that instead, especially if that allows us to get a bunch of additional locals interested.

Friday, January 20, 2017

Naval War battle report 5: Pacific Showdown

Another week, another game of Naval War.

After last week's demo game focused on battleship action, another of our local players was interested in moving some warships around.
For this demo game, we ended up using my small collection of 1/3000 scale minis instead of the 1/1800 stuff I normally use. The smaller scale is quite a bit cheaper and more portable, and now I would find out if the game still plays as nicely as it normally does with the smaller models.


In this game, we were playing US Navy vs Imperial Japanese Navy, with both forces created from the Coral Sea order of battle. My opponent decided he wanted to use the Japanese, so I ended up commanding the Allied task force.
Here we can see the forces closing with each other at the end of turn 1.


Here we have the US force, consisting of two squadrons.
The first, closest to the bottom of the picture, consists of heavy cruiser USS New Orleans and Farragut-class destroyers USS Dewey and USS Farragut.
The second, further up, consists of the heavy cruiser USS Northampton and the modified Leander-class light cruiser HMAS Hobart, attached to this task force by the Royal Australian Navy.


An overview of the ship cards.
Note that USS New Orleans is the flagship of her squadron and the overall fleet flagship while USS Northampton leads the other squadron.


The opposing IJN force also consists of two squadrons.
The first, on the left, contains the light cruiser Yubari and the Mutsuki-class destroyers Mutsuki and Uzuki.
The second, to the right, contains the Fubuki-class destroyer Sazanami and the Furutaka-class heavy cruiser Kako.


Kako is the fleet flagship and in charge of her squadron, with Yubari leading the other squadron.


On the first turn, both sides successfully move all their ships forward at flank speed, heading towards a confrontation between the two landmasses.
This does leave the US two-cruiser squadron lagging behind slightly, because they were initially deployed to swing wide around the island and come up behind the Japanese.

This outflanking plan was discarded after remembering just how bloody fast the lighter of the two Japanese squadrons was.

The turn ends with some ineffective lobbing of eight-inch shells between New Orleans and Kako.


On turn 2, the US force wins initiative and the lead squadron positions itself to deliver maximum firepower to the fast Japanese squadron before they can get close enough to deliver their extremely potent torpedoes.


Initial hits on Yubari and Mutsuki are solid but not enough to finish them off.
The fires might cause serious issues if they're not repaired, though.

Mutsuki needs to take a command check to not break off from the fight, which she passes.


Meanwhile, Kako also scores some hits on New Orleans, which did have to expose her broadside to deliver maximum firepower.


And then the torps are launched by Yubari and Mutsuki, a total of ten divided among four launches.

This leaves the forward US squadron quite concerned, though when Northampton and Hobart unleash their firepower, they at least manage to deal some more damage and start some flooding on Yubari.

Said damage also triggers a command check, which the cruiser fails.
This causes her to turn away from the battle, just barely avoiding the island in her movement, and breaks her out of the squadron.


When the time comes for damage control, the IJN force manages to stop all the fire and flooding on Mutsuki and Yubari.
Yubari also rallies, allowing her to effectively rejoin the force on the next turn despite her now-impractical position.

The Japanese torpedoes get resolved at the end of the turn.
The ones heading for the US destroyers fail to hit their nimble targets, passing harmlessly by.
USS New Orleans, which had exposed her broadside, was far less lucky, with three of the four torpedoes going in her direction scoring hits.

The effects on the already-battered cruiser are devastating: she is simply obliterated.
Counting caused flooding, the amount of damage from those hits could have crippled another cruiser in addition to what was needed to finish USS New Orleans off.

This leaves the Allies in a rather uncomfortable position: their two destroyers are now somewhat isolated up front and their fleet flagship is gone.
The one upside is that the destroyers might be in a good position to launch torpedoes against the Japanese vessels next turn.


As the US destroyers charge forward to deliver their torps, Kako and Sazanami open fire on USS Dewey and deal significant damage, forcing her to break off and leaving USS Farragut truly alone right in front of the IJN force.


Which means it's time for a desperate torpedo launch in the hopes of actually hitting something!


Of course, the rather battered fast group (of which Yubari has now been crippled by accurate fire from USS Northampton) manage to go to flank speed properly and vacate the threatened area.

Kako and Sazanami, on the other hand, can't really get out and go for the confrontation instead.

Quite a bit of gunfire is also thrown around, with USS Farragut dealing some damage to Sazanami and causing a fire on her. She herself takes some hits in return, though.


The four torpedoes headed towards Sazanami all miss, but two do strike Kako, dealing significant damage.

The next turn is incredibly tense, with multiple warships requiring only one or two good hits to be sunk. However, despite a number of hits on those ships, only one ship ends up taking real damage: USS Farragut, charging forwards with all guns blazing but failing to sink Yubari, takes some more damage and flooding that ensures she will sink by the end of the turn.

Along with USS Dewey failing to rally and the loss of USS New Orleans, that means the American side has less than half of their victory points left.

This triggers a command check, which I pass, giving me one more turn to maybe deal some damage before the battle ends and my surviving forces retreat in good order.

The final turn has some more maneuvering and a few long-range volleys trying to finish off damage ships, but to no effect.

Final result:

US lose one heavy cruiser and one destroyer, have one destroyer moderately damaged.

IJN have one light cruiser severely damaged, one heavy cruiser and two destroyers moderately damaged.

Overall, I'd call this a tactical victory for the Japanese: the Allies did not lose all of their assets, but that sunk CA in particular does hurt. Some damage was inflicted in return, but the only ship that will probably be out of the fight for long is Yubari.

Final thoughts:

This was quite an interesting game that got quite tense later on in particular, when several vessels were just a hair's breadth away from being sunk.
In fact, most of them did take some hits but managed to pass their armour rolls.

My opponent also enjoyed it quite a bit and is interested to play some more in the future.

If there's one thing I can take away from this it's that one should not underestimate the speed and torpedo threat ranges of destroyers and other small ships; I apparently forgot about that after experiencing the joys of battleships.
Of course, that means I should probably try to get Force Z on the table sometime soon for that interesting mix of battleship/battlecruiser with destroyer support.

As for the experimental factor of using 1/3000 scale ships instead of my usual 1/1800: things worked perfectly fine without any rules alterations whatsoever, which was really nice to see.
This means I might end up doing more 1/3000 scale stuff in the future, though I probably won't abandon 1/1800 scale forces entirely.
It also leads to some interesting questions about the scale I wanna do aircraft in.

About Naval War:

Naval War is a free living ruleset (which means it gets regularly updated to correct errors and clarify issues) that can be found at https://www.naval-war.com/.

If this seems interesting, do head over there, grab the rules and get some ships (or even just printed tokens to represent them) and head into the fight.
We in the community also really enjoy reading about your experiences with the game, no matter how glorious or horrendous they may be.

Friday, January 13, 2017

Naval War battle report 4: Denmark Strait

After far too long not playing, I finally managed to get in my first proper game of Naval War using the current version of the rules.
While most of my games so far have been cruiser battles in the Pacific, with an occasional carrier appearance, for this game we will be fighting a battle at the other end of the world.

We head over to the northern Atlantic ocean, where the German battleship Bismarck and heavy cruiser Prinz Eugen are trying to get clear of the Royal Navy so they can massively threaten Allied convoys between the USA and Britain.

In their way are the British battleship HMS Prince of Wales and battlecruiser HMS Hood.
Although Bismarck herself is superior to either British ship, a battleship and battlecuiser together should be able to vanquish a battleship and heavy cruiser.


Here we have the situation early in the battle.
The British force played by myself is at the bottom of the image, with HMS Prince of Wales (which had not moved yet during this turn) to the right and HMS Hood to the left. I have both of them operating as single-ship squadrons, which provides me with a total of four orders per turn: one for my fleet flagship (HMS Prince of Wales), two for the two large ships and one for my fleet commander, a Rear Admiral. He also gives me an extra disruption token each turn, which means I will always have one more disruption token than the German opposition has orders.

At the far side of the table we have the German force played by the owner of the local gaming store, de Purperen Draak. Bismarck is the larger vessel to the left, with Prinz Eugen by its side.
The German vessels have been put into a single squadron, giving them four orders per turn as well: one for the fleet flagship (Bismarck, of course), one for the single large ship, one for a squadron of two or more ships led by a flagship and finally one provided by the German commander. Being together in a squadron also lets one activation order activate both vessels, but at the cost of needing to stay close together. The German commander also provides a disruption token, giving both of us four orders and five disruption as long as we don't take any losses.


Let's skip forward a few turns since we deployed a bit too far apart. Seeing some pretty straightforward movement does not generally provide great tension.

Here, we can see how things are turning out: I'm sort of splitting my forces, leading off with the much sturdier Prince of Wales while Hood, which has powerful (but slightly short-ranged by battleship standards) guns but weaker armour hangs back a bit. This is a gamble, since it might leave Hood out of the fight for 1 or 2 crucial turns getting into range.

However, the Germans outrange me and have decided to turn ahead of me, hoping to deliver broadside fire against my front arcs.


To make matters worse, HMS Hood is in fact already in range of the Bismarck, which scores a solid hit among her first ranging volley. Fighting at these ranges, Hood's lackluster deck armour is really proving to be an issue.


As the Brits maneuver in on the next turn, their ranging fire fails to find the Bismarck.
Prinz Eugen finds the range of HMS Hood as well, though, and with the plunging fire her eight-inch guns are actually a fair threat.
Of course, Bismarck herself also unleashes a devastating broadside:


Two turns of fire at extreme ranges, with part of that spent ranging in, have clearly shown how Hood's iconic weakness has been exploited by the Germans.

Considering how close she was to the edge of the battlefield, I decided to use my commander's once-per-game ability to automatically pass the command check caused by this damage. I can't have this battlecruiser just running off without dealing significant damage.

As for the British return fire, it has still failed to find its mark despite the considerable number of 14- and 15-inch shells being flung towards the German battleship.


Of course, the next German volley proves equally devastating  despite British attempts at evasive maneuvering and causes another command check.


I try to re-roll the failed check using the "England expects every man to do his duty" special order, but German disruption prevents it from taking effect.
Of course, this means that HMS Hood breaks off. Being so close to the edge of the battlefield, she has no chance to rally before leaving the fight.

In the meantime, Prince of Wales has finally found the range on the Bismarck and is trying to deliver as many 14-inch shells as she can, trying to utilise a sustained fire training order two turns in a row.
However, things keep going wrong (thanks to German disruption) and unfortunate accidents instead reduce the effectiveness of her rear primary gun turret and her secondary guns. The shots that do connect are not as effective as one might hope thanks to quality Krupp armour (a German special order allowing you to re-roll saves).
She does deal a little damage to Bismarck and causes some flooding, though.

And then Prinz Eugen manages to get a decent firing angle for her starboard torpedo tubes as the battle is starting to turn into more of a brawl, with three torpedo hits and some pretty nasty damage as a result:


The die to the right of Prince of Wales indicates the amount of flooding, which is pretty bad.
One good thing in this turn is that the German leadership did not have enough orders to have Bismarck fire at Prince of Wales after her evasive action.
One bad thing is that a full broadside hit of 14-inch shells gets mostly saved through solid rolling and proper application of the Krupp armour special order. Making the opponent roll eighteen saves feels quite good, though.
Still, a quality volley could still get rid of Bismarck in one turn.


...and then I try to repair the four points of flooding I have.
Yup, one fixed with that 4+, but each result of 1 adds another flooding effect instead.
All of this damage ends up crippling HMS Prince of Wales, but her crew stand firm and choose not to flee just yet.
Sadly, Bismarck also passes her command check, which makes a lot of sense considering the current state of the battle.


On the next turn, the British side gets to activate first, but all of the clore-range fire only slightly dents Bismarck while secondary shots mostly bounce off Prinz Eugen.

Then the Germans get to shoot.

Bismarck's point-blank range volley with all guns brings Prince of Wales to the brink of destruction and sets her afire in addition to the flooding, after which some lucky hits from Prinz Eugen manage to finish her off despite desperate evasive action.


In the end, we get something fairly similar to the historical outcome, but probably even a bit worse; a seriously battered Hood makes it back home, but a brand new King George V-class battleship has been lost.

The damage caused in return was also rather limited: Bismarck took some serious dents but is still fully operational in terms of mobility and weaponry.
Assuming her fuel stores have not been damaged (as happened historically) the German pair would be more than capable of hunting down convoys while avoiding British warships trying to hunt her down.

Overall, quite an interesting little battle, especially considering that we had only two ships per side.
Initially, I was afraid that the British side would outmatch the Germans a bit too strongly, but as it turns out the Germans had some advantages that proved more important than they seemed, like their superior range which allowed them to start shooting a turn before the British.

Dice rolls this game were pretty even; both sides had both good and bad rolling, with a few stand-out moments like that full broadside hit and that total cock-up at flooding prevention.

For my first game using battleships, I feel they add an interesting factor to the game and look forward to using them more, especially in combination with more ships of other types.

I do have HMS Repulse and IJN Nagato waiting in the wings, with IJN Mutsu, Hiei and Kirishima still on the painting table as well, so that should provide some interesting options for the future.

About Naval War:

Naval War is a free living ruleset (which means it gets regularly updated to correct errors and clarify issues) that can be found at https://www.naval-war.com/.

If this seems interesting, do head over there, grab the rules and get some ships (or even just printed tokens to represent them) and head into the fight.
We in the community also really enjoy reading about your experiences with the game, no matter how glorious or horrendous they may be.