While most of my games so far have been cruiser battles in the Pacific, with an occasional carrier appearance, for this game we will be fighting a battle at the other end of the world.
We head over to the northern Atlantic ocean, where the German battleship Bismarck and heavy cruiser Prinz Eugen are trying to get clear of the Royal Navy so they can massively threaten Allied convoys between the USA and Britain.
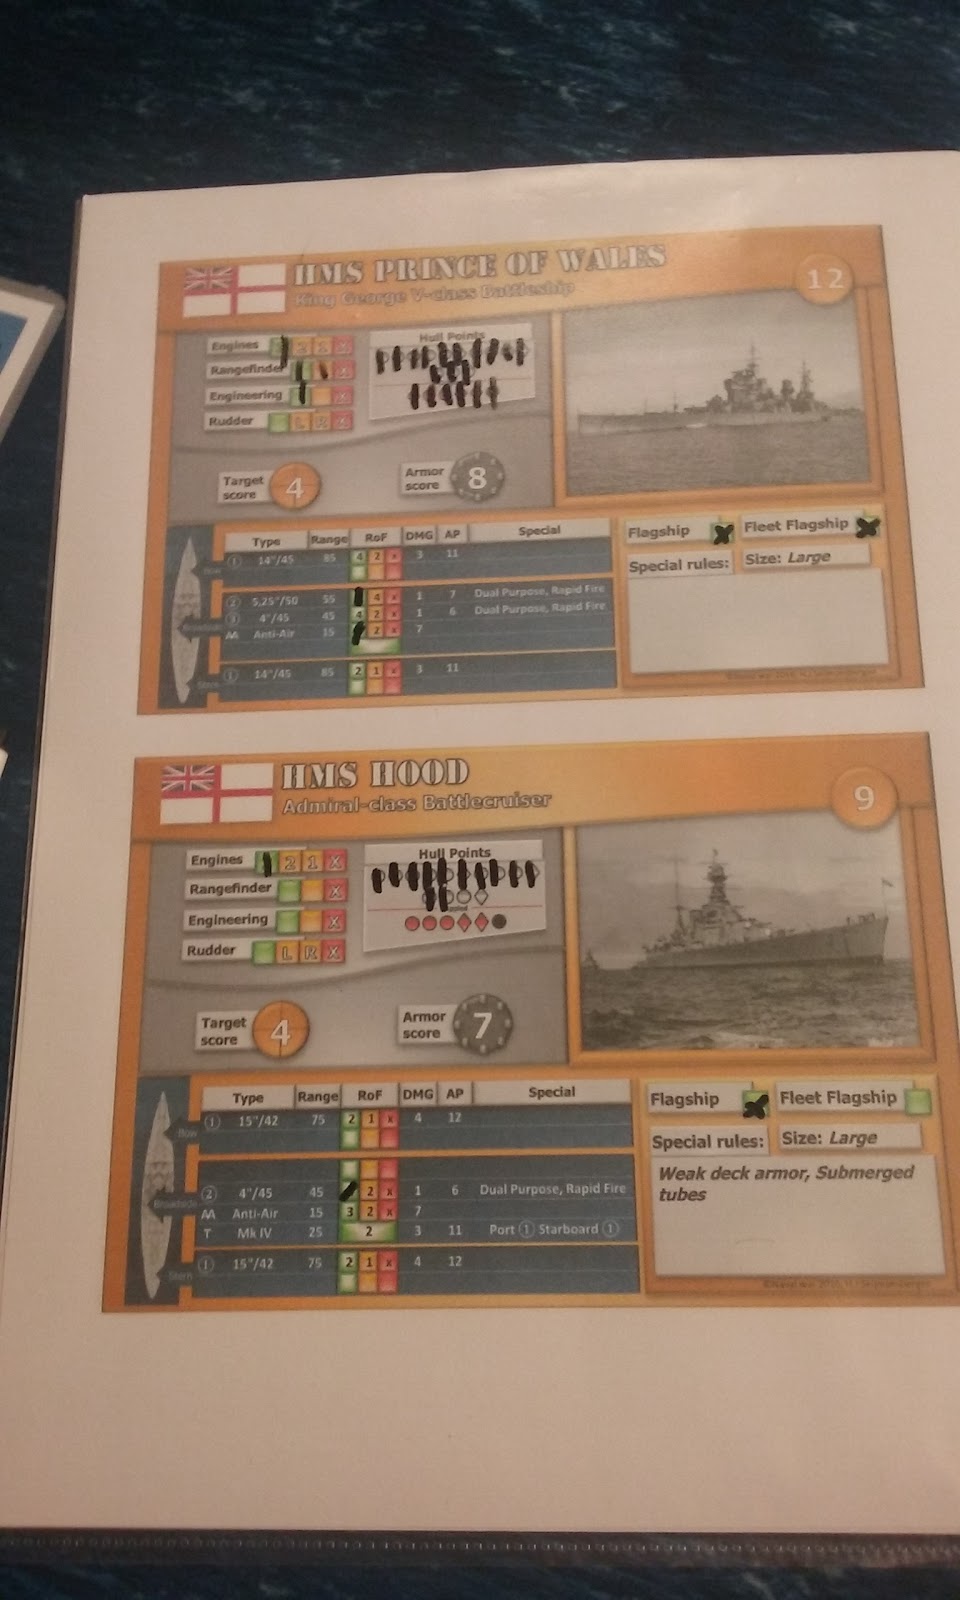
In their way are the British battleship HMS Prince of Wales and battlecruiser HMS Hood.
Although Bismarck herself is superior to either British ship, a battleship and battlecuiser together should be able to vanquish a battleship and heavy cruiser.

Here we have the situation early in the battle.
The British force played by myself is at the bottom of the image, with HMS Prince of Wales (which had not moved yet during this turn) to the right and HMS Hood to the left. I have both of them operating as single-ship squadrons, which provides me with a total of four orders per turn: one for my fleet flagship (HMS Prince of Wales), two for the two large ships and one for my fleet commander, a Rear Admiral. He also gives me an extra disruption token each turn, which means I will always have one more disruption token than the German opposition has orders.
At the far side of the table we have the German force played by the owner of the local gaming store, de Purperen Draak. Bismarck is the larger vessel to the left, with Prinz Eugen by its side.
The German vessels have been put into a single squadron, giving them four orders per turn as well: one for the fleet flagship (Bismarck, of course), one for the single large ship, one for a squadron of two or more ships led by a flagship and finally one provided by the German commander. Being together in a squadron also lets one activation order activate both vessels, but at the cost of needing to stay close together. The German commander also provides a disruption token, giving both of us four orders and five disruption as long as we don't take any losses.

Let's skip forward a few turns since we deployed a bit too far apart. Seeing some pretty straightforward movement does not generally provide great tension.
Here, we can see how things are turning out: I'm sort of splitting my forces, leading off with the much sturdier Prince of Wales while Hood, which has powerful (but slightly short-ranged by battleship standards) guns but weaker armour hangs back a bit. This is a gamble, since it might leave Hood out of the fight for 1 or 2 crucial turns getting into range.
However, the Germans outrange me and have decided to turn ahead of me, hoping to deliver broadside fire against my front arcs.

To make matters worse, HMS Hood is in fact already in range of the Bismarck, which scores a solid hit among her first ranging volley. Fighting at these ranges, Hood's lackluster deck armour is really proving to be an issue.

As the Brits maneuver in on the next turn, their ranging fire fails to find the Bismarck.
Prinz Eugen finds the range of HMS Hood as well, though, and with the plunging fire her eight-inch guns are actually a fair threat.
Of course, Bismarck herself also unleashes a devastating broadside:

Two turns of fire at extreme ranges, with part of that spent ranging in, have clearly shown how Hood's iconic weakness has been exploited by the Germans.
Considering how close she was to the edge of the battlefield, I decided to use my commander's once-per-game ability to automatically pass the command check caused by this damage. I can't have this battlecruiser just running off without dealing significant damage.
As for the British return fire, it has still failed to find its mark despite the considerable number of 14- and 15-inch shells being flung towards the German battleship.

Of course, the next German volley proves equally devastating despite British attempts at evasive maneuvering and causes another command check.

I try to re-roll the failed check using the "England expects every man to do his duty" special order, but German disruption prevents it from taking effect.
Of course, this means that HMS Hood breaks off. Being so close to the edge of the battlefield, she has no chance to rally before leaving the fight.
In the meantime, Prince of Wales has finally found the range on the Bismarck and is trying to deliver as many 14-inch shells as she can, trying to utilise a sustained fire training order two turns in a row.
However, things keep going wrong (thanks to German disruption) and unfortunate accidents instead reduce the effectiveness of her rear primary gun turret and her secondary guns. The shots that do connect are not as effective as one might hope thanks to quality Krupp armour (a German special order allowing you to re-roll saves).
She does deal a little damage to Bismarck and causes some flooding, though.
And then Prinz Eugen manages to get a decent firing angle for her starboard torpedo tubes as the battle is starting to turn into more of a brawl, with three torpedo hits and some pretty nasty damage as a result:

The die to the right of Prince of Wales indicates the amount of flooding, which is pretty bad.
One good thing in this turn is that the German leadership did not have enough orders to have Bismarck fire at Prince of Wales after her evasive action.
One bad thing is that a full broadside hit of 14-inch shells gets mostly saved through solid rolling and proper application of the Krupp armour special order. Making the opponent roll eighteen saves feels quite good, though.
Still, a quality volley could still get rid of Bismarck in one turn.

...and then I try to repair the four points of flooding I have.
Yup, one fixed with that 4+, but each result of 1 adds another flooding effect instead.
All of this damage ends up crippling HMS Prince of Wales, but her crew stand firm and choose not to flee just yet.
Sadly, Bismarck also passes her command check, which makes a lot of sense considering the current state of the battle.

On the next turn, the British side gets to activate first, but all of the clore-range fire only slightly dents Bismarck while secondary shots mostly bounce off Prinz Eugen.
Then the Germans get to shoot.
Bismarck's point-blank range volley with all guns brings Prince of Wales to the brink of destruction and sets her afire in addition to the flooding, after which some lucky hits from Prinz Eugen manage to finish her off despite desperate evasive action.
In the end, we get something fairly similar to the historical outcome, but probably even a bit worse; a seriously battered Hood makes it back home, but a brand new King George V-class battleship has been lost.

Assuming her fuel stores have not been damaged (as happened historically) the German pair would be more than capable of hunting down convoys while avoiding British warships trying to hunt her down.
Overall, quite an interesting little battle, especially considering that we had only two ships per side.
Initially, I was afraid that the British side would outmatch the Germans a bit too strongly, but as it turns out the Germans had some advantages that proved more important than they seemed, like their superior range which allowed them to start shooting a turn before the British.
Dice rolls this game were pretty even; both sides had both good and bad rolling, with a few stand-out moments like that full broadside hit and that total cock-up at flooding prevention.
For my first game using battleships, I feel they add an interesting factor to the game and look forward to using them more, especially in combination with more ships of other types.
I do have HMS Repulse and IJN Nagato waiting in the wings, with IJN Mutsu, Hiei and Kirishima still on the painting table as well, so that should provide some interesting options for the future.
About Naval War:
Naval War is a free living ruleset (which means it gets regularly updated to correct errors and clarify issues) that can be found at https://www.naval-war.com/.If this seems interesting, do head over there, grab the rules and get some ships (or even just printed tokens to represent them) and head into the fight.
We in the community also really enjoy reading about your experiences with the game, no matter how glorious or horrendous they may be.
No comments:
Post a Comment